Showing posts with label DIY. Show all posts

Friday, August 28, 2015

From the Repair Desk: How To Turn Pierced Earrings into Clip Earrings


We get this request a lot. Sometimes it is very easy, just remove the clip top and add the dangle to a clip top. Boom!

Other times, not so easy. 

When that happens, when a pair of earrings has an integrated post on a fancy top, we use a secret that I want to let you know about. The product Crystal Clay is perfect for filling in and attaching a clip where a post used to be. 


This two-part clay is easy to mix and can be placed in the space vacated by a snipped-off post. The pads for clip on earrings will attach nicely to the clay and we haven't found ANYTHING it does not hold, super-tight.

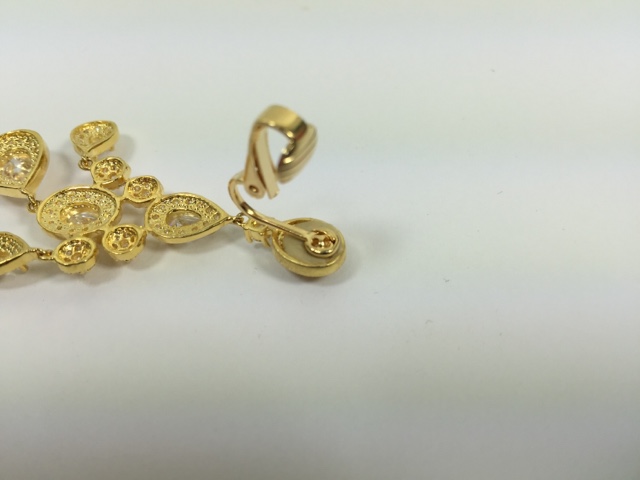
In the case of these earrings, we removed the post and the small bar that had been soldered in to hold the post in place using wire cutters. We then rolled a very small amount of Crystal Clay into a small ball (one for each earring) and then placed the clip finding in the space. We used a clip finding with a small ball atop the bar for this specific pair of earrings as the back of the earring was dented in a bit and the ball sat nicely in the space, held by the Crystal Clay.


We always allow the Crystal Clay to dry for 24 hours before giving the repair back to the customer. 

Some Crystal Clay tips: 
  • ALWAYS wear the gloves, this stuff isn't deadly, but it isn't good for you either.
  • Put down waxed paper to work on to keep the clay from getting on your table.
  • Keep the clay OFF sparkles, stones, crystal and metal you aren't sticking to anything. It can be a bit hard to remove small bits of it, so neatness counts.
  • The metallic colors aren't THAT metallic, so keep that in mind when you are planning the repair. The color we used, Gold, wasn't all that Gold, but it was all discretely hidden behind the earring top so it didn't matter MUCH. My favorite all-around color is the copper, It kinda looks like most metals. Kinda.
  • Use the product sparingly. It does not take much. 
  • The product ages and has a 'best used before' date on the package. We find that it works just fine for another six months to a year, but if you are interested in trying some NOW we've got a bit of it on sale that is marked down due to age. It will still work just fine for you, and you can try it at a huge discount! Click here to see the colors available. 


(note, this offer is only good until the 'past date' product sells out, so if you are interested, act fast!) 


Tuesday, August 18, 2015

How To Create Stackable State Rings with Your Besties


These sweet, stackable state rings are our newest private party here at the shop and this one is POPULAR! It's a fun way to spend an afternoon with your bridesmaids, sorority sisters or girl friends. Each person can make her own favorite state, or you can all make your home state! We have all 50 states. 

Taught by Sarah Tector, expert metalsmith, this is a fun, 2-3 hour party for a group.
To schedule, call the shop at 919-834-8634

If you are at a distance, and just interested in the states, see them here

Tuesday, June 30, 2015

Patriotic Chevron Make-N-Take

Join us all this week for a red-white-and-blue make-n-take. This set includes a bracelet and necklace, and you'll learn how to make a chevron design that can be translated to other colors with ease. 

At our work table, just $10 per set. Each kit includes illustrated, step-by-step instructions. 

Yes, we ship! Just call the shop at 919-834-6260.

Wednesday, April 15, 2015

get the Urge to DIY

Hey! You can visit Edge of Urge, one of our favorite Raleigh stores, and make a sweet pair of earrings while drinking wine. Yes, this is almost like heaven.

Or maybe it IS heaven?

Anyhow, check it out...those earrings (and that glass of pinot) are calling your name...

Wednesday, July 16, 2014

New Tutorial From Erin Siegel - Confetti Hoop Earrings

These Confetti Hoop Earrings are a sweet, colorful way to wear wrapped wire. The Magatama drop beads move nicely on the wire wraps, so there is a bit of a gypsy feel to these. Of course, the easy-to-follow directions from Erin Siegel are right here, just click!


Monday, July 14, 2014

Road Trip Leather Bracelet with Tiny State Charms

 Our newest tutorial, the Road Trip Bracelet, is a perfect way to commemorate your summer travels. This leather-and-chain bracelet uses tiny state charms and a message disc you stamp yourself. Perhaps instead of
'Road Trip' you stamp the trip dates, or your destination coordinates? You could also make one with the states you've been to, and leave room for the ones you still have to visit. Click the picture to see more about our Road Trip Bracelet download. You'll learn how to create a loop-riveted cuff, stamp a nice clear message, and how to add a really easy (and really pretty!) patina to raw brass stamped items. You can order it today, for instant delivery, just $2.90.

Wednesday, April 09, 2014

Filigree Earring DIY Ideas

We've got a few new filigrees on our site, and a secret code you can search for...find it and you can add a free item to your $25 filigree purchase. Hurry, this offer expires on April 14th.

Saturday, January 25, 2014

Romantica Braided Silk Wrap Bracelet How-To


This new project uses silk dupioni ribbon and some very romantic charms. The locket is dramatic and makes this a better-than-everyday wrap bracelet. 

Check it out here.

Thursday, January 02, 2014

New Frame Locket Calendar Template for 2014

download our new calendar template today and make a frame locket necklace to wear everyday
here is a necklace we made using those fun lockets, and some fun stuff-


Monday, July 08, 2013

5 Family Crafts That Travel Well - My Favorite All-Ages Crafts for Traveling


My family is headed off on a big vacation this week. It's a mountain trip, this time, to a bare-bones cabin. We have to bring just about everything we want for the week, and we tend to travel like Victorians anyway. This means we have to take sheets and towels, but our trusty minivan will also be loaded with rugs, hanging lanterns, speakers for the ipod and that big skillet I use to make paella.

Oh, and the craft stuff. We can't go anywhere without taking some making activities. What makes a good travel craft? For me, it needs to be portable and packable, easy to clean up and, most important-sharable. We're taking this trip with a big group of friends and any craft that gets started on the picnic table can attract a crowd, fast.

Wait, I have one last criteria for a good travel craft; it can't be trashy. It needs to be lovely. I want to make something (or help my friends make something) that I want to keep. I'm not a fan of time-killer crafts; the junky things made from foam stickers and paper plates and google eyes that keep your hands busy but really need to be popped in the recycling bin immediately when you get home. I try to find crafts that are engaging, interesting and look beautiful when they are finished.

This is my list of Great Travel Crafts:

1.Needle felting
Needle felting is a fabulous travel craft. You can embellish items that you are wearing or plan to wear, you can make toys, you can make felted book marks. Needle felting is appropriate for anyone old enough to hold the needle. Yes, I just wrote that. My children both needle felted at age 3 and no one lost a finger. They made dearly-loved balls of wool with eyes and ears and tails. I think they were supposed to be hamsters. Or kittens. Imagine a very young child's drawing, but three-dimensional. Children can also make snakes (long, ropey things) with ease. The wool is inexpensive, the tools are reusable and the clean-up is absolutely minimal. If you want to read an amazing needle felting blog, check out Puffy Little Things from New Zealand. Her work and tutorials are super incredible.
What you need:

  1. Wool Roving (get an assortment like this)
  2. Felting Needles (I like this tool to hold the needles, it is safer)
  3. Extras-yarn scraps, needles for stitching the yarn, buttons for eyes (you can also felt the eyes!)


2.Kumihimo or macrame knotting projects
Friendship bracelets and stacking bracelets are such a trend now that just about everyone in your group will want to make something colorful and knotty to wear. You can use a kumihimo braiding board or print out and make your own. You can also embrace your inner love-child and create some macrame bracelets. I love the bracelet tutorials on this site for macrame and knotting.

What you'll need:

  1. yarn or cording of some kind (I like this hemp assortment)
  2. kumihimo braiding boards  (I like this assortment of shapes)
  3. scissors! I like these cute ones!
  4. a ruler or yardstick is also helpful


3.Altered books
Creating an altered book while on a trip is a nice way to make the scrapbook in the moment. Especially if you are travelling with school-age children, this can be a good way to insert some quiet time into your day. We've do this on beach trips. We borrowed a small photo printer from a friend and each day the children could cut, paste, paint and stitch their pages describing the activities that happened the day before. I'm one of those people who has boxes of photos and ticket stubs and maps that I want to add to a scrapbook 'someday' - doing the book ON the trip means nothing else has to go into that box! To create an altered book scrapbook on your trip, take along some scissors, glue sticks, rubber stamps, ink pads, markers, an old book and a photo printer. The rest of the embellishments can come from your trip. For inspiration, you can check out this book.

4.Apothecary bottle necklaces
These tiny glass-bottle necklaces are a great travel craft. You can fill them with beach sand, sharks teeth, a feather, a leaf or a tiny rock from the mountains. This craft is EASY PEASY and perfect for the 'I am not crafty' set.
You'll need:
tiny glass bottles (find them here)


5.Decopatch
Decopatch requires a bit more of a work space, and some drying time, but it's a great rainy-day-on-vacation craft. You can cover a paper-mache animal, or a box, or you can even Decopatch a pair of shoes! This craft is also good for the 'I'm not crafty' crowd as it involves little more than paint brush strokes and really, you can't mess it up!

5.Metal-etching
Don't laugh at this last one. I am trying it this week in the mountains with a group of friends. We'll take some copper discs and decorate them with words or images using Sharpie markers. We'll etch them and then use a punch to turn them into pendants or key-chains. Handmade souvenirs, voila! This meets my criteria for a not trashy craft, and I don't think it will be super hard to clean up.

Do you have a favorite travel craft you think I should try? Leave it below in the comments.
Friday, July 05, 2013

Knuckle Ring Free Project and DIY


Join us tonight to make one of these Knuckle Rings for free at our work table, 6-8 pm. We'll also feature this project at our table all week for just $3. Watch the video below to see how we did it!


Saturday, June 01, 2013

How to make a braided leather bracelet - a quick Vine DIY

Do you use Vine? If you have a smart phone it is a fun way to make super-short (30 seconds, max!) videos with a unique, easy stop-action format. We love it here at the Big O, but mostly for cute dog videos and funny tricks. This is our first-ever Vine How-To.

Check it out.

If you like the project join us on First Friday, June 7th, and you can make this project for free from 6-8 pm.

Friday, May 31, 2013

Make Your Own Midi or Knuckle Rings - it's easy!


This video shows you how to make an easy and quick midi ring...and shows you how much Cynthia really NEEDS a manicure!


Friday, May 10, 2013

Make a photo pendant with us this weekend!

Bring a 32x28mm photo to Ornamentea this weekend and you can make a sweet photo pendant necklace for just $5. We'll have the resin, and the assistance, you need to create a wonderful keepsake for Mom, Grandma or anyone.

Click here to download a photo template good for all our bezels.

Pendant necklace making will be available
Friday 12-8
Saturday 10-5
Sunday 12-5

Here's a video showing you how to make one of these pendants:

Thursday, July 05, 2012

How to finish ball-chain ends, a video


This video will help you with the Colorfields Necklace project. See it here.

Friday, June 01, 2012

New tutorial! Stockholm Summer Necklace

Check out this brand spankin' new tutorial for the Stockholm Summer necklace!  We used Lucky Squirrel shrink plastic and  ball chain in Jonquil Yellow (one of our new colors!)... a perfect summer accessory!

Thursday, May 17, 2012

Bridal Tiara How-To

We have a new how-to for bridal jewelry over on the Tutorials Page. The directions are written for a metal hair comb but they can be adjusted for a tiara or headband fairly easily. Click here to download the instructions for free.