Showing posts with label jewelry making. Show all posts

Tuesday, August 18, 2015

How To Create Stackable State Rings with Your Besties


These sweet, stackable state rings are our newest private party here at the shop and this one is POPULAR! It's a fun way to spend an afternoon with your bridesmaids, sorority sisters or girl friends. Each person can make her own favorite state, or you can all make your home state! We have all 50 states. 

Taught by Sarah Tector, expert metalsmith, this is a fun, 2-3 hour party for a group.
To schedule, call the shop at 919-834-8634

If you are at a distance, and just interested in the states, see them here

Wednesday, November 20, 2013

Gilded Gold Tassel Earrings and Necklace DIY

Our newest project from Erin Siegel. We love this elegant, dressy set. Click here for the free project instructions. 

You should pin this on Pinterest, you know you love it!

Friday, June 01, 2012

New tutorial! Stockholm Summer Necklace

Check out this brand spankin' new tutorial for the Stockholm Summer necklace!  We used Lucky Squirrel shrink plastic and  ball chain in Jonquil Yellow (one of our new colors!)... a perfect summer accessory!

Thursday, December 01, 2011

P.S...I love this

I just saw this collage on P.S.-I made this and it reminds me of these items.

 
They are all on my studio table right now, awaiting a final home.


I think I want to combine this necklace idea with a tassel somehow...
Maybe right in the center, made of that green hand-painted cotton? Hmm...
anyhow, check out P.S.-I made this. She's makes amazing inspirational collages...

Friday, November 11, 2011

New Tutorial - Woven Bead Collar

There is a new tutorial up for you today and let me just say it was HARD to write. This is actually not hard to do, but the directions involve an awful lot of 'loop through to point (B) and then through to point (C)' kinda stuff that makes my head spin. I have to tip my hat to the talented artists like Kathy King and Marsha DeCoster. 

This necklace is made up in round Czech druk beads but you could use Swarovski crystals, or pearls. I am kinda having a love-affair with druks right now. They work really well in designs where you want to see the design, not the bead. You could make this bracelet in colors to match the necklace, by the way. 

And right now I want to go make a version of this necklace in black beads...how pretty would that be?

Friday, July 15, 2011

Granulation with fine silver...

If you are interested in granulation, enameling or metal working  you should visit the new blog, Experiments With Glass and Silver by Lillian Jones. She's got an excellent post up now about how to fuse the granulated bits with a fusing aid. Lillian writes poetically about the very prosaic work of heating and forming metal and her stepped-out, how-to photos are tremendously clear and helpful. Lillian also demonstrates a method for creating silver granules that was developed by Iris Sandkuhler and will give you something WAY better to do with that Fry Daddy you have in the pantry.


here is a link to Lillian's blog
here is a link to her granulation class at Ornamentea, come take an in-person class with her!

*and Lillian gave me a random, 'six-degrees of separation' moment earlier this year when she told me about her friend, the artist Iris Sandkuhler. Iris was a drawing TA in a few classes I took at Ohio State waaaaayyyy back in the late 80's. She has no reason to remember me: I was a proto-goth, black-clad art student in a sea of Doc Martens on a giant university campus. But I do remember Iris; she had such a musical name and seemed so intently cool in the way graduate students always are. I'm excited to see all the things she is now doing in the jewelry and metals world.


Friday, July 08, 2011

new tutorial - the Sunset Silk necklace

This pretty necklace tutorial can be found here.

Sunday, June 05, 2011

Atami Necklace featuring kimono cording...

see the full directions and how-to photos here on our tutorials page

Friday, May 27, 2011

This is an end detail from a vintage necklace I purchased years ago.

I was very interested in the way the necklace was constructed. It is a larger-sized ball chain (maybe a 5 or 6?) in brass wrapped with a spiral of seed beads. The seed beads seem to be strung on really small memory-wire. Way smaller than ring size. I wondered at this for a long time until I realized it was probably just a mechanical spring of some kind, stretched out and strung with the seed beads. The whole necklace is finished at each end with deep brass caps and there is a hook and a beaded chain for the closure. The necklace is a bit short on me, I'm not much of a choker wearer right now, but the technique could be easily adapted for a longer necklace or a bracelet.

To see the more shots of the whole necklace visit my other blog, 365necklaces and look for the May 24th post. 


Friday, April 01, 2011

Oui ou Non? What's it gonna be, girl?

Try this sweet project using our new French charms...and a bit of suspense! Instructions here.

And don't miss the next project-sign up for the Dispatch right here and get 2 free projects delivered to your
mailbox every week! Of course, we don't share or sell your address...

Wednesday, March 16, 2011

Create a forged bail for St. Patty's Day!

You can create a forged bail for a two-holed pendant on Thursday night at Technique Thursday. You'll learn a few methods of twisting, pounding and coiling wire to make a one-of-a-kind bail. Hand-crafted findings are the way to set your work apart! Join us from 5:30-8:30 for a fabulous make-n-take for just $3. 

For more infomation about this and other Technique Thursdays click here.

Monday, February 21, 2011

Springy New Project; Eyes & Eyelets Bracelet

This project is for Friday's Dispatch but I was so pleased with it I decided to share it here, today. Now I'll have to go create something else new for Friday!

I love these new stone skulls. They are carved from howlite and dyed in a turquoise blue or left in their natural, skull-colored howlite white. Either way, they are pretty cheery for skulls, don't you think? I made three of the bracelets and might just make a few more. I'm really in the mood to layer up the bright, colorful bracelets this year for some reason. 

The deerskin lacing is very soft and comes in some lovely colors. Like all leathers, it does stretch a bit so I recommend making the bracelet on the short side or pre-stretch the leather. I used the Crafted Findings Riveting Tool to set the eyelets in the ends of the deerskin. This tool is so amazing, it sets rivets and eyelets so perfectly you don't have to be embarrassed about the backs of your jewelry. I used the tool to punch holes in the leather quickly and then to set the eyelets, creating a loop for the jump ring. The tool flares the eyelet with such a nice finish.


fold the leather, then punch hole
insert the washers and eyelet
such a nice finish!

Then I created the spinning flower charm. I used the Crafted Findings tool to create a hole in the middle of the cab setting. Then I fed the eyelet, flower and washer (star shaped!) onto the eyelet. The tool flared the eyelet so quickly, and so perfectly!

punch a hole in the cab setting
fit the setting with the eyelet

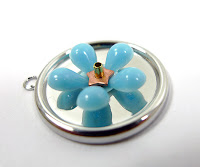
stack the flower and accent

flare the accent using the tool


To create the skull bead dangle I used an extra thick brass head pin. It is sturdy enough that you can skip the wire wrapping...

thread bead onto jump ring
loop with round nose pliers

I have a video I shot while making this that will be up on YouTube very soon...I'll let you know.

The ingredients for one bracelet:
7 inches deerskin lacing, 3/16” wide
2 square jump rings, 1/2 inch
5 riveting accents  
5 eyelets, 1/16th inch x 1/8th inch 
Tools
Crafted Findings riveting tool with 1/16" eyelet setter
Round nose pliers
Flat nose pliers
Wire cutters or scissors

For the in-depth directions you'll have to wait for the Dispatch!

Hey! the video is up: right here on our YouTube channel 


Thursday, February 03, 2011

These earrings feature lovely sculptural bead cages cut from brass tubing. The edges have been 'coined' or cut with tiny hash marks using a hammer. This technique is the featured technique tonight at Technique Thursday here at the store. You'll saw the tubing and then coin the edges. It's an amazing detail that really sets the earrings apart.

Our Technique Thursday is a drop-in class focusing on metalsmithing techniques and tips each Thursday night. For just a few dollars you can make the project under the watchful eye of one of our most talented staff members. For free you can watch others make the project.

We'd love to see you tonight. If you'd like to look at upcoming Technique Thursdays click here.

Monday, January 10, 2011

Free Pendant Templates

We have created several quote templates to fit the Ranger Frames in our shop. There are also blank templates to help you insert your own quotes...

Click here to download the template and see the project...

Monday, January 03, 2011

Everyday Wrapped Bracelet How To

This is called the Everyday Wrapped Bracelet because I have worn at least one, everyday, since I made the first one. I can't help it. They sit right there on my wrist, showing off a perfect Elaine Ray bead and a bit of waxed linen. I have made them with ball chain and with the Swarovski crystal chain. They are both lovely. I stack them up or wear them alone.

Um, yes, I may just be a bit obsessed.

See the entire tutorial here.

Tuesday, December 14, 2010

Sunny Day Dogbone Bracelet

This bright and sunny project is perfect for a cold winter day. That dog bone may tempt your canine companion, but more importantly, it will make you smile every time you look at it!
Tell winter you are looking forward to a walk in the park-all materials and full directions are available here. Hand made lampwork dog bone by Lori Flanders of LORiOLA beads and also available on Ornamentea.com.

Saturday, December 11, 2010

New wrapped leather bee bracelet how-to

This bracelet is made with leather cording, Swarovski pearl chain and waxed linen. The linen wraps around the leather and chain to attach them to one-another and add a diagonal stripe to the design. Click here for the full tutorial and ingredients listing.

Monday, November 22, 2010

Free project idea featuring Lori Flander's lovely toadstool bead

Click on the post title to see the tutorial. This double-strand necklace features a checked ribbon and just a bit of sparkle. Sweet!

Tuesday, November 16, 2010

Try It Tuesday with this ribbon charm bracelet


This sweet ribbon bracelet uses fold-over ribbon ends for a permanent, professional finish. You can make one today for just $2 at our worktable. These bracelets would make great gifts!

I'll see you at the worktable today!
Click the post title for more information about Try It Tuesday.