Showing posts with label decopatch. Show all posts

Tuesday, May 12, 2015

Ready-to-finish wood beads...I like them!

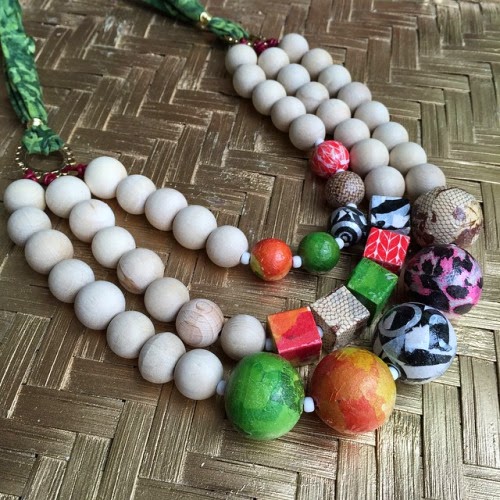
This necklace has been on my mind a lot lately. I made it for a display at the shop and now keep wanting to wear it. Sadly, it's part of a pretty, chalkboard display created by Maya. That means I can't pilfer it for my daily adornment.

Sigh.

The necklace is made of wooden beads, with the center beads all individually finished in Decopatch papers. The sides are plain, unfinished beads, which I actually really like the look of. The back is a section of Bali batik, so it's super comfortable to wear.

I should post a pic of the display. I should also just make myself another one of these. Maybe with some Sankofa beads thrown in for good measure?

Wednesday, August 21, 2013

August Project of the Month

there is still time to make a Decopatch Lantern at our work table. This $5 project is a great way to learn how to use Decopatch papers to decorate your life. The waterproof glue/varnish is easy to use and so permanent. These lanterns can hang outside or in. 

Join us any day in August to make this project!

Saturday, December 29, 2012

Dresser Redo Inspiration - How To Make A Plain Dresser Fabulous


My daughters have a dresser in their bedroom that is in sad need of a redo. It's a good, sturdy wooden dresser we picked up at a used furniture store for a very good price, mostly because the top and front were subjected to a bit of abuse over the years. I intended to paint it a solid bright tangerine orange when we purchased it last year but then both my girls objected to the color and they couldn't agree to any color. I vetoed their suggestion of pink with kelly green polka dots as too-too. Is is their room, so I do give them a vote but I get ultimate veto power!

This dresser from Bryoni Porter is so inspiring to me. I think I could do that very nicely with Decopatch papers and it would be appealing.  Their walls are very pale cocoa brown (they picked the color) and the wooden floor has a diagonal brown-and-white checkerboard pattern so a big pop of colors from bright Decopatch papers would be nice. I could do the top in a solid color or just one style of paper.

This chest is also from Bryoni Porter and I swear they are the butterflies from this Cavalini paper...

All her work is amazing. I love that big pattern-mixy thing and if I was in Britain I'd be sorely tempted to indulge...

To do this kind of a dresser re-do, I'd use a mix of Decopatch papers like this (their dresser would take three assortments, and below I'll tell you how to figure out how much paper you need for any dresser.)  I'd also use the Decopatch varnish, as that stuff is SUPER durable and very waterproof, which is perfect for a dresser that will take a lot of abuse!

I just want to take a second here to say why I would NOT recommend Mod-Podge for this kind of project. Good old M-P, as we call it in our house, is a fabulous thing BUT not where wear-and-tear are concerned. Mod Podge is basically a version of Elmer's white glue. Remember that fabulous glue from elementary school? It covers nicely, is cheap and WASHES OUT. Any glue that will wash out of clothing or a second-grader's hair cannot be considered permanent. If I spend $$$ on papers and time to cover a piece of furniture in my house, I really want it to be permanent.

So, what about you? Would you have a dresser like this in your home? Do you have an opinion on Mod-Podge? If you do, share it with me in the comments section below. I'd love to know!


How to determine how much paper you need for a dresser-

in  inches:
measure the top from front to back and then from side to side, then multiply these two numbers (T)
measure the front from side to side and then from top to bottom, then multiply these two numbers (F)
measure the side from top to bottom and then from front to back, then multiply these two numbers (S)

add up (T) + (F) + (S) + (S) = a big number
multiply that big number by 1.5

Your total number will be in square inches and will tell you how many square inches of paper you need to do your project.
Don't be discouraged but the huge number you have.
Divide your big number by 165, that will tell you how many sheets you need.
Decopatch papers are sold in 15x11 inch sheets. That's 165 square inches per sheet.

Note: My measurement does not include any drawer sides or the insides of the legs. The extra that you get by multiplying the whole number by 1.5 accounts for and trimming and edging.
Tuesday, November 20, 2012

Thanksgiving Day crafts for the whole family

I write about this every year. I can't help it. Somehow spending a whole day in the kitchen, drinking red wine and sprinkling sage on anything that doesn't move makes me want to be crafty. I take that feeling out on my dinner guests. I call it Forced Crafting.

Since they come back each year, I guess they like it, too.

If you are spending Thanksgiving with family and want to do something other than talk about politics or football or, heaven forbid, hit the 'early bird' sales, you need to craft. It's the best option. After the dinner is over just commandeer the dining table for an hour or two of MAKING THINGS. Your family and guests will thank you.

I promise.


Try making decopatched soap dispensers. Load up on some inexpensive pump-style soaps and get a mix of decopatch papers and glue. Cover the dining room table with an old shower curtain. Turn on some jazzy music. Get your uncle to do the paper-tearing, and let the kids cover the bottles in glue. Watch this video to prep for the experience. These make good teacher gifts, by the way!

Warning: this IS messy. Fun, but MESSY.

Create tiny snowman ornaments. This project is not messy. This project involves sticking a piece of wire through some felt balls. And using a permanent marker. These tiny snowmen are perfect for tying on gifts or just hanging around the house as snow-day good luck charms. See the tutorial for info. 

 Read a few more ideas here. 

Monday, February 06, 2012

Frankly, my Deer...


Hayley has almost finished Decopatching that lovely deer head. He'll have blue-and-white 'fur' and a swirly, green-and-blue antler set. He's sweet.

Come see him in person if you can...we haven't added the deer to the website yet, so if you live far away and want one you'll have to call us at 919-834-6260 (M-F 10-9, S 10-6, Sun 12-6) and we can ship one to you...

Thursday, October 20, 2011

Holiday blues...


I'm busy finalizing our activities for the holidays this week.
It pains me to write that. Not because I don't love the activities we have planned, but because, for Pete's sake, it's not even HALLOWEEN.

and as a retailer, let me just say that I am running REALLY late.

Out here in retail-land we are supposed to be all done and planned out for the BIG holiday season by about, oh, March.
I can't bear to do that.

We wait. We do think about things. And we place some orders early. And we have that Handmade Holiday event in October but still, I am really not so eager to decide on party refreshments for December RIGHT NOW.

Oh well, I am going to just crank down the A/C and pretend it's all Dicken's Christmassy out there...

And if you want to know what we have planned for Thanksgiving weekend, well, check out the classes page...look for the pink horse, and the stamped pendants, and a snowman or two!

Oh, and although I'm all Shop Local I do love Nordstrom's for this window decal:


image taken without any permission whatsoever from the Consumerist blog...so go read them!

Thursday, June 02, 2011

How To Make Waterproof Paper Pennants Using Decopatch Papers


Are you making pennants for an outdoor party or event? Do you just want your paper pennants to last a bit longer than a day or two?

We like mixing fade-resistant Decopatch papers to create a set of fun pennants that will last for ages.

Making custom pennants is a great way to carry through a theme or decorative color scheme in your party, but these pennants can also be hung around a bedroom for a bit of whimsy. Making pennants is simple, you'll just need a few tools and some Decopatch papers and varnish.

You'll need: an Ex-acto knife or other paper cutter, a cutting mat, a ruler or straight edge and some plastic to work on when you get out the varnish.

For all the details, watch our quick how-to video shot in the dawn of You-Tube (back in 2011!)
You can watch the video of how to make these paper pennants below, but please be nice and don't tell us the picture is blurry. That was a first-generation iPhone.

Decopatch papers in a pretty mix for this project are right here.
The waterproof varnish can be found here.

Don't forget to try one of the Decopatch brushes, they really do make the project go faster!


note: this post was edited on 8-31-16 by Cynthia to update links

Thursday, April 28, 2011

New Decopatch video...and a great gift idea!

This is a quick and fun way to make a custom soap dispenser for any sink in your house.
Or the house of a friend.

Really, who wouldn't like to get a sweet bottle of a nice pump hand soap in a pretty container? Tie a bow on this and bring it to the next dinner party.

Wine is so 2010.

Watch the video here.


Monday, April 11, 2011

Come see our newest video tutorial...click on the sweet bunny!

Tuesday, December 07, 2010

Try It Tuesday with Decopatch ornament


The holidays are upon us!  Join us today and learn how to refurbish those old glass ornaments that are chipped and a little worn out.  You can give them new life with some Decopatch paper!  Don't have an old ornament to bring in?  No worries, we will have plenty of plain clear ornaments to use as well.  Only $2.00 each.

Thursday, September 23, 2010

Sprucing up the store...

Tracy and I spent the first official day of Autumn sprucing up the store. Here's some video I shot before I started...now it's had a day of work so it looks a lot different. I used lots of RED paint!


See you soon!

Wednesday, July 14, 2010

Hard things to make...

Yes, I know the babies are adorable. Just focus for a moment, okay? The talented ladies at Yankee Crafty B*tch have created a lovely mobile that took way longer than they thought it would. No, the babies weren't eating the felt balls. The project just got away from them and things didn't go as planned. Has that happened to you? Yeah. Go over and read their blog post and you can even enter to win a box of goodies from us just for sharing your own 'took me way too long' story and pictures.

No, the babies aren't part of the prize package. I already asked.

You can see the blog post and the directions for making your own (now fool-proof!) mobile here.

Tuesday, May 18, 2010

Friday, January 08, 2010

Snowy Day!

Dear Reader-
This blog, my stores and my home are all located in the South. Raleigh, North Carolina to be exact. This means we must at all times be prepared for severe winter weather, extreme snow conditions and the resulting cabin fever. I have taken steps to make sure my family will not suffer if we are trapped for extended periods in our home; we have a good stock of pantry staples on hand, bottled water, plenty of warm blankets and lots of craft materials to keep us all busy.
Thank goodness I am prepared. The National Weather Service predicted a possible 1/2" of snow this morning; last night school was put on an immediate 2-hour delay. The morning dawned with absolutely no snow or ice or even a stray hailstone. Did I mention it was 33 degrees outside? Yeah.

BUT luckily I had the materials ready to help my family through the agony of two hours of cabin fever. We made pancakes. We read a book. Then, we Decopatched some letters. While I am a fan of the Aquapro Glue Varnish in this case we just used plain old Mod Podge. The letter won't be outside or exposed to much wear-and-tear, humidity or touching.

Cleo tore the Decopatch paper up onto small pieces and then applied Mod Podge using a brush or her fingers. She smoothed the paper nicely around the paper mache letter.


Cleo is seven, and her letter turned out quite lovely. Her younger sister is three and she could have done this project as well, but Nora is quite finicky about getting her hands sticky. Cleo shares my love of textures, even goopy, sticky, gluey ones! Nora provided lots of advice and offered wet towels about every two minutes.

The project was finished just in time to get dressed for school. I hope you are enjoying your snowy days!

All materials and supplies are available on line here. The paper mache letters are not listed on our website, but you can contact the store and we are happy to ship any letters or words to you. Good luck on your next snow day.

Wednesday, December 02, 2009

Thrifty-Swifty Gifties 3


This week's gift idea is from Cut-Out-And-Keep, a great project-sharing web site that I love.

The idea is to use wire plant baskets as forms for a paper lantern. This one is made with craft paper (think brown paper shopping bags!) You could also use Decopatch paper or a fancy paper like this Midori Green Lace Paper. I would finish my project with a nice coat of Aquapro varnish to make it more durable and keep the colors bright.

Find the original project directions at Cut-Out-And-Keep right here.

Monday, June 22, 2009

New Magazine - Handcrafted Jewelry


This new magazine is coming from Interweave in August. I have two projects in the magazine and think it is going to be very popular with our customers. The focus will be on mixed-media jewelry, with articles on how to use everything from glues to wood to mica. The whole idea behind the magazine is to present projects for designers who create without defining their work by a single medium. I am not sure if this is the final cover or not...we'll have to see in August, I guess!

Wednesday, June 17, 2009

How To Decopatch (Decoupage) Shoes


Recently a mom was in the store covering a pair of her son's worn out shoes with Decopatch paper. It seems that he wants something unusual. She carefully applied a nice layer of Decopatch Sealer to seal them up, since he wants to wear them.

This made me think about a messenger bag that is in the back of my closet. Even though it is so worn I refuse to carry it, I haven't gotten rid of it. The bag is made of vinyl billboard fabric, repurposed, and I bought it at least 15 years ago. I love the pockets inside, they are placed just right, and the strap is wide and comfortable. The 'indestructible' fabric is worn from years of travel and daily use. Perhaps I could freshen it up with some strategically placed Decopatch flowers?

This project was so easy. She first prepped the shoes by wiping them off with a cloth. If your shoes were dirty at all, I recommend a nice stiff brush, first. Just make sure the surface is clean and there are no bits of dirt on it. Apply the paper in small bits, using plenty of sealer both under and over the paper (it acts as a glue) to make sure your paper is STUCK!

This could be done to a pair of fancy heels, too. Imagine updating those darn patent-leather nude shoes we ALL have in our closet. Right now they say 'Hello, 2015!" but with a bit of deco patch they could say 'Hello, tomorrow!"

Friday, January 30, 2009

Love for sale...


the love of a sweet paper-mache giraffe, to be precise. Yes, we need the room and Miss Fifi is now looking for a home...she cost us $250, but you can have her for just $99 and that price includes uncountable amounts of Decoupatch paper...

sorry, you gotta pick her up yourself, we can't ship her...

she is 5"3' tall and made of paper-mache

call 919-872-4767 if you are interested...

Monday, November 24, 2008

Getting Crafty with the Family


Are you hosting a whole crowd for Thanksgiving? Are you the out-of-town auntie who needs to arrive with magic tricks up your sleeves? Either way, I am a big fan of forced crafting. Seriously. While dinner is cooking or after the table has been cleared you can insist that everyone join you in making something. A few will complain, but if you are insistent you can get a good participation level. The memory of making something together will be with everyone for years; long after the memory of seeing Bolt at the multiplex fades.

What are some good crafts for the multitudes?

I like beaded snowflakes pictured above. Get out all the still-clean soup bowls from the china cabinet and fill them with 6-0 beads and other sparklies. Show Grandpa how to twist the wire on the ends to make a loop and let the kids make snowflakes nature never would. It's o.k. to make a mix of crazy colors. Hang these all in Aunt Edna's window when you take her back to the nursing home or send one home with each family to remind them how you are all alike, but different.

Try making some bottle cap magnets with a resin (Amazing Glaze or Diamond Glaze) and old magazine photos. Grab some buttons, bits of tinsel and other found objects to add the the fun, or let your family members cut up some dictionary pages to make magnets with a message. Glue a magnet on the back of the bottlecap after the resin is dry or cooled off.

Cover something with Decopatch paper...a chair or table, Uncle John's truck, whatever. This is a big project that all can help with...if you want to go the easy route try covering individual paper mache animals or buy a box of new pencils...voila! great stocking stuffers!


What are your favorite crafts for groups? Post them in the comments section..

Tuesday, August 07, 2007

new decopatch paper just in...

We opened this box today and saw this lovely paper. Several of our old favorites have been out of stock so I was happy to see them.

Some of our favorite papers are being discontinued by the factory in France. We'll have new ones to take their place, but we do get attached around here. I am sure that the new papers will be fabulous, though, and we are eager to see them when they finally make their way here. The lovely Emily, our resident Parisienne, says that it's really true what they say. France closes down for the month of August. She's there right now, enjoying her family and hopefully picking up some new crafty ideas for us. Nous vous manquons, mon chéri!