Showing posts with label decor. Show all posts

Monday, January 27, 2014

I love this...

We've been working for the past few weeks to change up the store. I LOVE this. Really, moving and shaking things up at the shop is one of my most favorite things.
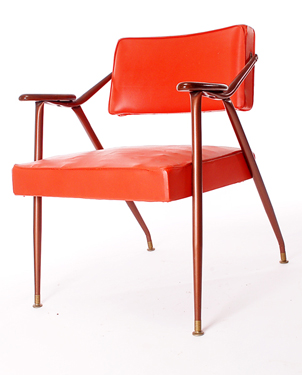
I really like our (returning) seating area for visitors. This is for Mike, and everyone else who always says 'why did you get rid of the couch?' Those fab orange mid-century chairs are for sale...unless I buy them and take them home myself. Don't worry, if that happens we'll replace them. The return of the seating area has been much needed. 
We also have lots of new decor items that make me smile. Like this little metal dog. He's very noble, don't you think? He's guarding that vintagey floral jewelry holder, it seems quite safe with him on duty. 
This nifty tool chest is an ideal item for your studio...
Even the mix table got a make-over! 

We aren't done yet. There are still two mysterious new things coming to Ornamentea. Next time you stop in, look for the empty orange picture frame and see if you can guess what will go into it. 


Friday, September 13, 2013

Animals Can exhibit benefiting Second Chance Pet Adoptions

The Animals Can exhibit opens tonight at Second Chance Pet Adoptions. You can see what an amazing group of area artists have made from...pet food cans. Really, these beautiful frames above are all created using cat food cans. The art work in this show will make you think twice about your recycling bin!

Want to make your own can art? Join us Sunday at Pop-Up Sunday and make a can-art treasure box! Pop-Up Sunday is from 12-5 in the Ornamentea parking lot and this month all the proceeds from beer donations go to Second Chance. We'll have beer from Carolina Brewing and a great group of vintage and handmade vendors.

See the full N&O article about Animals Can right here. It's going to be fun!

Wednesday, August 21, 2013

August Project of the Month

there is still time to make a Decopatch Lantern at our work table. This $5 project is a great way to learn how to use Decopatch papers to decorate your life. The waterproof glue/varnish is easy to use and so permanent. These lanterns can hang outside or in. 

Join us any day in August to make this project!

Saturday, December 29, 2012

Dresser Redo Inspiration - How To Make A Plain Dresser Fabulous


My daughters have a dresser in their bedroom that is in sad need of a redo. It's a good, sturdy wooden dresser we picked up at a used furniture store for a very good price, mostly because the top and front were subjected to a bit of abuse over the years. I intended to paint it a solid bright tangerine orange when we purchased it last year but then both my girls objected to the color and they couldn't agree to any color. I vetoed their suggestion of pink with kelly green polka dots as too-too. Is is their room, so I do give them a vote but I get ultimate veto power!

This dresser from Bryoni Porter is so inspiring to me. I think I could do that very nicely with Decopatch papers and it would be appealing.  Their walls are very pale cocoa brown (they picked the color) and the wooden floor has a diagonal brown-and-white checkerboard pattern so a big pop of colors from bright Decopatch papers would be nice. I could do the top in a solid color or just one style of paper.

This chest is also from Bryoni Porter and I swear they are the butterflies from this Cavalini paper...

All her work is amazing. I love that big pattern-mixy thing and if I was in Britain I'd be sorely tempted to indulge...

To do this kind of a dresser re-do, I'd use a mix of Decopatch papers like this (their dresser would take three assortments, and below I'll tell you how to figure out how much paper you need for any dresser.)  I'd also use the Decopatch varnish, as that stuff is SUPER durable and very waterproof, which is perfect for a dresser that will take a lot of abuse!

I just want to take a second here to say why I would NOT recommend Mod-Podge for this kind of project. Good old M-P, as we call it in our house, is a fabulous thing BUT not where wear-and-tear are concerned. Mod Podge is basically a version of Elmer's white glue. Remember that fabulous glue from elementary school? It covers nicely, is cheap and WASHES OUT. Any glue that will wash out of clothing or a second-grader's hair cannot be considered permanent. If I spend $$$ on papers and time to cover a piece of furniture in my house, I really want it to be permanent.

So, what about you? Would you have a dresser like this in your home? Do you have an opinion on Mod-Podge? If you do, share it with me in the comments section below. I'd love to know!


How to determine how much paper you need for a dresser-

in  inches:
measure the top from front to back and then from side to side, then multiply these two numbers (T)
measure the front from side to side and then from top to bottom, then multiply these two numbers (F)
measure the side from top to bottom and then from front to back, then multiply these two numbers (S)

add up (T) + (F) + (S) + (S) = a big number
multiply that big number by 1.5

Your total number will be in square inches and will tell you how many square inches of paper you need to do your project.
Don't be discouraged but the huge number you have.
Divide your big number by 165, that will tell you how many sheets you need.
Decopatch papers are sold in 15x11 inch sheets. That's 165 square inches per sheet.

Note: My measurement does not include any drawer sides or the insides of the legs. The extra that you get by multiplying the whole number by 1.5 accounts for and trimming and edging.


Friday, February 10, 2012

Upcycled Valentine Garland

Cathe over at Just Something I Made shared a way to turn bits and pieces of boxes into a sweet garland. I know she thinks this is a Valentine's day thing but honestly, I would keep this up most of the year. In my house, red is the neutral!

Check out the complete post...here.

Monday, February 06, 2012

Frankly, my Deer...


Hayley has almost finished Decopatching that lovely deer head. He'll have blue-and-white 'fur' and a swirly, green-and-blue antler set. He's sweet.

Come see him in person if you can...we haven't added the deer to the website yet, so if you live far away and want one you'll have to call us at 919-834-6260 (M-F 10-9, S 10-6, Sun 12-6) and we can ship one to you...

Tuesday, September 13, 2011

Uncomfortably close...or why we need new chairs

We currently have a 1940's cut-velvet love seat in our store that is very sweet. The idea is that we have a great space for friends to sit while their crafter shops.

The love seat gets occupied most often by men ('tis true!) and as happens quite often they don't know each other. The way the two men will sit next to each other-so uncomfortable!- is comical.

We decided a long time ago to replace the love seat with two chairs. I have a pair of chairs in my mind that would be perfect. Vintage, of course, and upholstered in easy-to-clean vinyl or a bit of worn upholstery. I'd prefer orange.

Am I asking too much?

Maybe, I can find chairs similar to what I want but they are all very, very expensive. Come on, crafty people! Surely someone out there has an auntie who needs to clean out that spare room?


This is our current love seat. Yes, it's for sale, $250. Almost perfect condition, by the way!


this is a close up (sorry it doesn't seem to be in focus!) of the upholstery


this is what I'd like, but old and worn and a bit less perfect...and two would be good!

 I'd even take this one...

 Or this one...

Can you please check your aunt's attic? Tell her I have some great beads to trade!

EDITED ON WED. NIGHT:
we sold the love seat! congrats to Melissa from Texas...now how are you gonna fit that on the plane?

Monday, September 12, 2011

Getting ready for holiday?!?!

Tracey's making a lamp and I helped!!!


This weird bag is filled with copper tubing, ammonia and kosher salt.

Sound yummy?

Just wait until you see what Tracey makes out of it...I did shake the bag, though!

Watch this video to see our work-in-progress today. Oh, and I also was interviewed HERE by News14.
Yes, I am throwing a party and hoping you come!


Tuesday, June 21, 2011

Jewelry Storage Ideas...around the home

I love this image I saw on the Art Bead Scene blog. That is EXACTLY what my house looks like. Okay, well, I do have a frame with necklaces pinned up in it. Okay, the frame is just a cork bulletin board (not pretty picture frames with nice cloth)  and it's 3x4 feet wide (not dainty and artfully arranged)  and it has at least 150 necklaces on it (not just a few, elegantly edited) but other than that it is the EXACT same...

I do get a lot of questions about how I store all my jewelry. My other blog, 365necklaces means I can't display them in this artful way as I have to sort them into Worn and Pending.* I love the idea of putting jewelry out there where you can see it as the art it is.

Go read the post here on the Art Bead Scene for some other good storage ideas that put the jewelry on display.

*I am wearing a different necklace every day for a year. I post a daily picture. At least, I take a daily picture, I post them when I get around to it.

Saturday, June 04, 2011

Garden Jewelry


Vintage chandelier crystals hanging from our bamboo bean trellis.
I used Wildfire to hang them, just looped it over the bamboo.

They are very pretty in the sun and surprisingly sparkly in the dim light of evening.

Thursday, April 28, 2011

New Decopatch video...and a great gift idea!

This is a quick and fun way to make a custom soap dispenser for any sink in your house.
Or the house of a friend.

Really, who wouldn't like to get a sweet bottle of a nice pump hand soap in a pretty container? Tie a bow on this and bring it to the next dinner party.

Wine is so 2010.

Watch the video here.


Tuesday, April 26, 2011

Worth Remembering


I saw this sign at Revival Antiques in Raleigh. One of my favorite places to get things for the store and my home...

Wednesday, November 24, 2010

Santa's Laundry Felted Decoration Project Idea

This cute bit of decor is perfect for keeping your family busy after dinner on Thursday. What? no, really, why not hand them the wool, the directions and a few felting needles. You can go take a nap. Perfect.

Find the directions here, you may need to scroll down a bit!

Need some other ideas for the whole family after the big meal? Try this link.

Friday, November 05, 2010

I think that I need a new lamp...

This sock lamp was created by Dominic Wilcox, a designer who took part in a 30-day speed creating challenge. He made 30 items over 30 days using (mostly) item he had on hand. The projects are funny and inspired. You can read the sock lamp post here and see all his other posts as well. I think a cluster of these hanging in the corner of my living room would be pretty nifty. He doesn't say how they bulbs would be changed, but I think I can work that out.

Saturday, October 23, 2010

Beaded Spider Web How-To Video

This project uses a snowflake frame to create a sparkly web. This might seem like a seasonal decoration to you, but I think I am going to make one for my grandmother, Cleo. She can hang it in her kitchen window and she'll enjoy it year-round.

She never kills a spider. She always says they eat bugs and she'd rather have spiders than bugs.

Good advice, I think.

Thursday, September 23, 2010

Sprucing up the store...

Tracy and I spent the first official day of Autumn sprucing up the store. Here's some video I shot before I started...now it's had a day of work so it looks a lot different. I used lots of RED paint!


See you soon!

Monday, December 14, 2009

Coffee Cardboard Wreath

there are no words, just click on the picture to visit the project at Cut Out And Keep.com.

oh, I'd use this ribbon.

Friday, December 11, 2009

Wonderful Wreath

This beautiful wreath using our felt ball assortments was recently featured on my new favorite Norwegian blog, Pickles. This blog has amazing photography, beautiful knitwear patterns (in Norwegian) and a clean, hip design aesthetic that makes me want to clean out my house and paint all my furniture white. Or various shades of white.

This wreath uses our felt balls stitched over a straw wreath form. I think I will make one over a styro wreath form I have lying around. Maybe I'll wrap it with roving first. These balls are stitched on but you could glue-gun them if you wanted.

Oh, the ceramic moose head sent my husband searching for a similar item to adorn our home. I told him we'd need to get all the furniture painted first.